Browning T Bolt 22 - 60's Belgian Made Restore

wavygravy

New Member
Oct 28, 2014
23
0
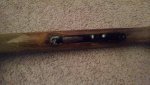
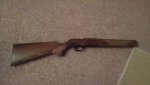
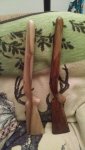
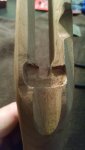
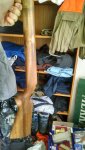
So my Uncle In-Law gave me an old rusty 22 over Thanksgiving since he does not hunt and has not touched the thing in years. Turns out its an old Browning T-Bolt 22LR and I'm pumped, Ive been wanted to get a 22 but other hunting wants have gotten in the way. After a little research it turns out these things are a bit of a collectors item, and also a tack driver when working properly. I was able to unfreeze the action, clean up the gunk that's built up over the years and oil it down to stop anymore rust from forming. My plan was to refinish the stock, get a decent scope and call it a day until I read about Browning's infamous history with salted stocks. After a bit of reading and comparing the condition of mine to others, I've definitely got one. I even licked an exposed piece last night and it tasted like a salt shaker.

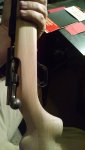
Luckily the barrel and action are still in good shape, whoever had the gun before had put some pretty serious coats of urethane down, but it still couldn't keep the salt back completely. Luckily I found gunville.com who had several replacement stocks on hand, in fact, 30 minutes after placing my order online Rob called and gave me the rundown on what he had and if I had any questions, fantastic customer service. I was lucky to find him since they don't really pop up on internet searches when looking for stocks.

Next step is getting the stock sanded and finished, scope mounted and then finding some tree rats to terrorize. I plan on using Tru-Oil gun stock refinishing kit for the stock, if anyone has any other suggestions I'm all ears. The reviews make it out to be a very good kit though.

Anyone else have experience with these neat little guns? I'll post my progress as I move forward, this is my first restoration so I'm pretty excited.
 

Colorado Cowboy

Super Moderator
Jun 8, 2011
8,327
4,712
83
Dolores, Colorado
I use Tru-Oil a lot, it is a good finish to work with. After you have prepped the stock and are ready to apply some finish, take the oil and thin it with some type of thinner ( I use lacquer thinner). It will penetrate the wood easier and dry quicker. After 3 or 4 coats of the thinned oil, sand and then apply the regular oil finish. Don't forget to apply some to the inletted area and barrel channel. Leave no area of the wood un treated with finish as it seals it and keeps moisture out.
 

Ikeepitcold

Administrator
Staff member
Feb 22, 2011
10,023
1,609
Reno Nv
You should post before photos if you have some and progress photos till finished. It would be cool to see your work on the rifle.
 

libidilatimmy

Veteran member
Oct 22, 2013
1,140
3
Wyoming
When using oil based finishes in our old furniture shop, we would thin the finish with straight mineral spirits for the first several coats. We felt that using the mineral spirits instead of another thinning agent allowed the finish oil to penetrate better, but it does increase drying time. Another trick we used was to heat up the wood a little with a hair dryer with the oil based finishes on the first one or two coats, depending on the type of wood, which allowed the finish to "soak" into the fibers better. Good luck on the project and show us some picks along the way.

Additional comment: If you have to do any fitting, sanding, etc. to the stock prior to finishing, make sure you blow the stock off aggressively with an air compressor. The small particles produced from altering the stock to fit can and will find any void in the wood fibers and can adversely affect the bond of the finish to the wood.
 
Last edited:

Colorado Cowboy

Super Moderator
Jun 8, 2011
8,327
4,712
83
Dolores, Colorado
When using oil based finishes in our old furniture shop, we would thin the finish with straight mineral spirits for the first several coats. We felt that using the mineral spirits instead of another thinning agent allowed the finish oil to penetrate better, but it does increase drying time. Another trick we used was to heat up the wood a little with a hair dryer with the oil based finishes on the first one or two coats, depending on the type of wood, which allowed the finish to "soak" into the fibers better. Good luck on the project and show us some picks along the way.

Additional comment: If you have to do any fitting, sanding, etc. to the stock prior to finishing, make sure you blow the stock off aggressively with an air compressor. The small particles produced from altering the stock to fit can and will find any void in the wood fibers and can adversely affect the bond of the finish to the wood.
I use a tack rag to remove all the sanding particles.
 

wavygravy

New Member
Oct 28, 2014
23
0
Thanks guys, some more good notes to run with. I'll get some before pics up here tonight / tomorrow. I've already got the barrel looking 100% better than what it was, but there will be more progress once I get the new stock in.

Side note: I used CLR to try and break up the rust in one of the bad areas and let it sit a bit too long. If you didn't know already, not only does CLR work great on rust, that stuff does wonders on bluing too. Luckily it will be covered up by the stock and I can use some cold bluing to make sure it's alright.
 

wavygravy

New Member
Oct 28, 2014
23
0
Here's a couple pics, the barrel has already been cleaned up a bit but still has some more to go. You can see on the stock where the finish is chipping off, hint #1 its a salt stock, then how the trigger guard was getting eaten away. I was able to find another original guard online cheap without the corrosion so I have that on it's way now too. It's strange how some areas were being affected by the salt, while others are perfectly fine.

The barrel and the rest of the internals are all still good. There's a few blemishes on the bolt itself you can't see in the pics, but I am hesitant to try and remove them out of fear of removing any metal and making it too loose. I'll probably just lightly polish it and call it a day, blemises add character.

Unfortunately the new stock I have inbound will not have the checkering, I will learn to live with it since I am not skilled or patient enough to learn that technique. Maybe in a few years I can afford to send the stock off to be professionally done.

12-3 Pics (1).jpg12-3 Pics (2).jpg12-3 Pics (3).jpg
 

Colorado Cowboy

Super Moderator
Jun 8, 2011
8,327
4,712
83
Dolores, Colorado
Unfortunately the new stock I have inbound will not have the checkering, I will learn to live with it since I am not skilled or patient enough to learn that technique. Maybe in a few years I can afford to send the stock off to be professionally done.

View attachment 11610View attachment 11611View attachment 11612
There are some perfectly good substitutes for checkering, at a fraction of the price. There are lots of people doing laser engraving/checkering. On my competition Cowboy Action guns I use it instead of checkering as it has superior gripping for your hands. It cost me less than $200.00 to do my 1873 Winchester replica comp gun.
 
Last edited:

Cobbhunts

Veteran member
Jan 22, 2014
1,060
1
Kentucky
Very nice wavy! Thanks for the update. Maybe I'm just partial to those old Browning's, but that's about as cool a project as could be.
 

Mr Drysdale

Active Member
Mar 24, 2013
440
333
Great project. Congrats on the rifle. I too have used the True Oil. Follow the directions above and after the final coat has dried apply some Johnson Hardwood Floor wax liberally and let it dry overnight. It will be a job to polish it the next day but you will have a beautiful finish that is nearly indistructable! Good Luck!
 

wavygravy

New Member
Oct 28, 2014
23
0
So I've made some good progress, but there's still plenty more to be done before I get to shoot it. I received the new stock, and although it's 90% finished, there is a lot of fitting and sanding to be done so everything works properly. Using an oil lamp to soot the barrel it was a process of sooting, sanding, and repeat. Slowly getting the barrel and action laid into the stock. At this point I am mostly finished, now I am working on sanding down the internal portion to get that looking decent, I am not concerned about it being 100% like the outside, but still want it to be nice.

The main stock / external portion needs to be brought down about 1-2 mm so I can get the parts flush after having to inlet them a little more than I thought. It will work out anyways, I want to slim the stock down a bit since it's a little fat for my hands.

A couple things I have learned, the new 3M sandpaper that says it lasts 10x longer, they aren't lying, it's awesome. I had normal stuff, tried the 3M out and went straight to the store to buy all the types they had. It lasts longer and doesn't clog up like the regular stuff. Another thing is to always point chisels away from your hands for obvious reasons, my wife is starting to think I'm cutting myself on purpose. I've made a few mistakes with them so far, but nothing that will greatly take away from the look. More love marks than anything.

I'd say I have about 10 hours into it so far, and see at least another 5-6 of sanding time to get it down to the 800-1000 grit paper. The stock has a lot of character so I can't wait to get the Tru-oil on it and start seeing what she will look like. It's black walnut, so it should darken up nicely without the stain.
12-5 pics(2).jpg12-5 pics.jpg
 

wavygravy

New Member
Oct 28, 2014
23
0
The name of the game has been sanding, sanding and more sanding. Started with 120 grit and worked up to 400 which seemed to be smooth enough to point out flaws. I've also found that when working on it that it's impossible to not hit everything within arms reach and cause a ding and give more sanding work.

I had to drill a couple holes for new sling mounts which was very difficult to do not having a base to hold it with. I think they came out pretty good.

Last night I put the first coat of Tru-oil on with about 50% mineral spirits to give it a chance to soak in a little more. Tonight will be the grain filling coat where I will wet sand using the tru oil and then wipe into the grains.

Overall I'm really happy how it's turning out though. Once she gets a couple more coats the wood is going to be gorgeous, when it was still wet one of the burls looked like a tigers eye. I hope I can shoot her over xmas. That's if I can find 22 ammo! What's with all the hoarding guys?
12-14 Pics(2).jpg12-14 Pics(1).jpg
 

sneakypete

Veteran member
Aug 9, 2011
2,822
276
Oakdale Ca.
What a great project! I really like the grain pattern in the new stock and seeing your progress. I'm learning a lot reading this thread.