Browning T Bolt 22 - 60's Belgian Made Restore

Colorado Cowboy

Super Moderator
Jun 8, 2011
8,306
4,682
83
Dolores, Colorado
The name of the game has been sanding, sanding and more sanding. Started with 120 grit and worked up to 400 which seemed to be smooth enough to point out flaws. I've also found that when working on it that it's impossible to not hit everything within arms reach and cause a ding and give more sanding work.

I had to drill a couple holes for new sling mounts which was very difficult to do not having a base to hold it with. I think they came out pretty good.

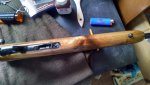
Last night I put the first coat of Tru-oil on with about 50% mineral spirits to give it a chance to soak in a little more. Tonight will be the grain filling coat where I will wet sand using the tru oil and then wipe into the grains.

Overall I'm really happy how it's turning out though. Once she gets a couple more coats the wood is going to be gorgeous, when it was still wet one of the burls looked like a tigers eye. I hope I can shoot her over xmas. That's if I can find 22 ammo! What's with all the hoarding guys?
View attachment 11713View attachment 11714
I apply enough coats to fill the grain (sanding/steel wool) between coats. Usually take 10 to 12 coats. I really like a satin finish , so I use rubbing compound or powdered pumice and light mineral oil to rub out the finish to a deep luster.
 

wavygravy

New Member
Oct 28, 2014
23
0
Update on the grain filling. The process outlined in the Tru-oil instructions suck. I tried it the first time as it said and once dried I ended up with paper towel particles all stuck in the finish and the grain wasn't totally filled. The issue is that it says to wait until the entire stock has a slurry on it, well once that happens the first part you started on it already dried up and wont move around, which rips and shreds the paper towels. Luckily 0000 steel wool takes that stuff out once dry.

I did it again last night and here's what I ended up doing. Save your dust from sanding and mix it in with true oil to make a slurry. Get a small paint brush and brush it on and sand it down with 400 grit sand paper. I did about a 1/4 of the stock at a time. Once happy with the slurry pile, take a small cotton rag and brush against the grain until there are no more slurry marks. It seemed the more the rag was used, the easier it was to wipe off the excess. Then run over the entire stock in the light to make sure there are no runs in the finish and wipe those off too. This made it wayyy easier and didn't leave little paper bits all in the finish.

I'm glad to see people are enjoying this thread, hopefully it helps someone in the future. There are TONS of articles online touting one method or another, I like to think mine blends a bunch of them into one. The proof will be in the product. I'll update again once I have a few more coats and start to see a gloss. I'm debating on a gloss finish or a satin one. I am partial to gloss since I love a pretty shiny gun, but I think a satin sheen will give it an older feel that this gun would look good with.

The funny thing is I've already started looking at used gun shops for another rifle that could use a refinishing. I'm really enjoying this project and could see it as a fun way to get through the winter.
 

Colorado Cowboy

Super Moderator
Jun 8, 2011
8,306
4,682
83
Dolores, Colorado
Update on the grain filling. The process outlined in the Tru-oil instructions suck. I tried it the first time as it said and once dried I ended up with paper towel particles all stuck in the finish and the grain wasn't totally filled. The issue is that it says to wait until the entire stock has a slurry on it, well once that happens the first part you started on it already dried up and wont move around, which rips and shreds the paper towels. Luckily 0000 steel wool takes that stuff out once dry.

I did it again last night and here's what I ended up doing. Save your dust from sanding and mix it in with true oil to make a slurry. Get a small paint brush and brush it on and sand it down with 400 grit sand paper. I did about a 1/4 of the stock at a time. Once happy with the slurry pile, take a small cotton rag and brush against the grain until there are no more slurry marks. It seemed the more the rag was used, the easier it was to wipe off the excess. Then run over the entire stock in the light to make sure there are no runs in the finish and wipe those off too. This made it wayyy easier and didn't leave little paper bits all in the finish.

I'm glad to see people are enjoying this thread, hopefully it helps someone in the future. There are TONS of articles online touting one method or another, I like to think mine blends a bunch of them into one. The proof will be in the product. I'll update again once I have a few more coats and start to see a gloss. I'm debating on a gloss finish or a satin one. I am partial to gloss since I love a pretty shiny gun, but I think a satin sheen will give it an older feel that this gun would look good with.

The funny thing is I've already started looking at used gun shops for another rifle that could use a refinishing. I'm really enjoying this project and could see it as a fun way to get through the winter.
This is the way I started out when I was 16 or 17....too many years ago to mention! I ended up making stocks, made around 100 until I quit doing it 10 years ago. Be careful....the bug could bite you!
 

Sawfish

Very Active Member
Jun 9, 2011
767
128
Peoples Republik of Kalifornia
I have a couple of the old T-Bolts. One that I bought in the sixties, and the other one I picked up some twenty years ago. Great shooters and very unique. Neither have the dreaded salt wood, but I acquired a Browning FN action Safari in .375 H & H some years ago that had the salty stock. I could not find any type of finish that would seal in the salt, and prevent it from leeching onto the metal. Out of desperation, I tried sealing the barrel channel and stock interior with Brownell's Acra-Glas. That did the trick. Twenty five years later and still no rust! FYI. At one time Gun Parts Co. had extra magazines for the T-Bolt. Not sure if that is still the case.
 

wavygravy

New Member
Oct 28, 2014
23
0
About Finished

So after about 6-7 coats of Tru oil I got the finish I was looking for. I put the gun together and took it to the range to see how it shot. Turns out this thing is awesome, after getting it dialed in it was no problem hitting the target over and over. Squirrels will have a tough time with this one. The finish isn't perfect, but I never expected it to be, so overall I am very happy with the outcome. Im still going to use the satin finish that comes with the kit after it's fully cured. It should be awesome and I cant wait to poke the first squirrel.

Tbolt Finish (14).jpgTbolt Finish (6).jpgTbolt Finish (4).jpgTbolt Finish (3).jpg