
The "hunting gear" storage shed project
- Thread starter Stay Sharp
- Start date
Sorry to disappoint but the trusses are set at 24" OC not 16". Floor joists were set at 16". Since Im using 1/2" OSB, 24" spacing is proper. You will see in the pics that wall studs and trusses are spaced 24" apart. I designed the trusses per the WI 60 Lbs/Sq ft snow loading. We have never experienced such snow loading and since I have 2 roof rakes, there would never be such a load on this roof anyway.
Last edited:
buckbull
Veteran member
- Jun 20, 2011
- 2,189
- 1,380
Ahhh, I assumed the walls where 16" centers.Sorry to disappoint but the trusses are set at 24" OC not 16". Floor joists were set at 16". Since Im using 1/2" OSB, 24" spacing is proper. You will see in the pics that wall studs and trusses are spaced 24" apart. I designed the trusses per the WI 60 Lbs/Sq ft snow loading. We have never experienced such snow loading and since I have 2 roof rakes, there would never be such a load on this roof anyway.


In order to work safe while installing the roof decking and later shingling, we built a temporary scaffolding. (Ladders suck) Then it was time to trim the truss tails and install sub facia. Having scaffolding helps in doing a straight and square job that shows up when viewed from the ground.


sneakypete
Veteran member
Time to raise most (but not all) of the roof sheeting (1/2” OSB) 4 Full sheets and 4 half sheets were nailed in place. The two sheets at the bottom of the overhung “lean to” portion of the roof were not installed so that the 3 support posts and header could be installed. (They needed to be raised above the roof line in order to be dropped down into the holes that were dug)

The last sheets of roofing we not installed with the rest so there would be room to raise the 3 treated 4 x 4’s and their header to support the roofed overhang. Holes were dug (Through mostly rocky ground with some clay soil around them. This dirt really sucks for digging) Since there is not enough suitable soil to put back in the hole the support post holes are backfilled with paver base and tamped and settled with water. Then all three posts all were trimmed to the same height and the 4 x 4 header beam raised and installed. All the truss tails were then nailed to the header beam and trimmed and the sub facia installed. Then the last sheets of roof decking installed.


The last sheets of roofing we not installed with the rest so there would be room to raise the 3 treated 4 x 4’s and their header to support the roofed overhang. Holes were dug (Through mostly rocky ground with some clay soil around them. This dirt really sucks for digging) Since there is not enough suitable soil to put back in the hole the support post holes are backfilled with paver base and tamped and settled with water. Then all three posts all were trimmed to the same height and the 4 x 4 header beam raised and installed. All the truss tails were then nailed to the header beam and trimmed and the sub facia installed. Then the last sheets of roof decking installed.
sneakypete
Veteran member
")
Before we can shingle we have to install the metal drip edge. Before the metal drip edge is the final trim, before the final trim is the facia and soffit trim and none of that can be installed until more siding is installed so that where we focused our efforts next. Aside from hot dip galvanized nails, the sheets of fiber cement siding are also attached with construction adhesive. Then the first trim boards were installed along the roof line and all the seams between the sheets of cement board siding were caulked. While we were in trim mode we added some of the vert. corner trim and final roof edge trim pieces. Then all the trim was given two coats of exterior paint.


Slugz
Veteran member
The metal drip edge is installed which means we are ready to start shingling the roof.

We look forward to the weekends because it affords a lot of time to work on the shed. The weather doesn’t care so we suffered a rain delay.

We looked out the window and saw the local inspector checking out the progress.

When everything dried up we build more temporary scaffolding so we can safely work on the roofing.

We look forward to the weekends because it affords a lot of time to work on the shed. The weather doesn’t care so we suffered a rain delay.
We looked out the window and saw the local inspector checking out the progress.
When everything dried up we build more temporary scaffolding so we can safely work on the roofing.


With the exception of the ridge cap, the front side of the roof is complete as the sun sets on another day.

The ridge cap is added the next morning and completes the roofing job.

Now that the roofing is complete the scaffolding is removed so the final wall can be closed in. The windows are the first thing to go in.

Then the last sheets of cement siding.

It’s starting to look like a shed now.
The ridge cap is added the next morning and completes the roofing job.
Now that the roofing is complete the scaffolding is removed so the final wall can be closed in. The windows are the first thing to go in.
Then the last sheets of cement siding.
It’s starting to look like a shed now.
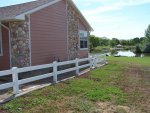
The fiber cement siding is very heavy which means the doors need to be stout so they won’t sag over time. The door framing is finished.

Tight joints, construction adhesive and long decking screws should keep the doors from sagging as time goes by.

To make the doors really strong and to tie it all together, the fiber cement siding is attached to the frames with construction adhesive and nails. The door frames are spaced and shimmed and held in place with big clamps so the siding can be added right in place to better control gaps and clearances.

The clean up crew grabbed the camera while we added the cement siding to one of the doors.

Tight joints, construction adhesive and long decking screws should keep the doors from sagging as time goes by.
To make the doors really strong and to tie it all together, the fiber cement siding is attached to the frames with construction adhesive and nails. The door frames are spaced and shimmed and held in place with big clamps so the siding can be added right in place to better control gaps and clearances.
The clean up crew grabbed the camera while we added the cement siding to one of the doors.
Then the entire door is removed and painted before the trim and hinges are added. The trim is painted too.


Colorado Cowboy
Super Moderator
When I saw the last picture, I suddenly realized what you are calling cement siding is a lot like what I called "Hardy Board" siding. When we built our home in 2000, vinyl siding was used, which I was not real happy with. In 2010 the siding on the south facing surfaces was a mess. Sun UV exposure had ruined it. I decided to redo the whole house, garage & workshop. No easy task for a 3800 sq ft house, 50x50 garage and a 20x35 shop. Looks nice now and should last a long time.

We bought it at Menards which lists it as "Fiber Cement" siding. Great product but heavy as heck.
http://www.menards.com/main/building-materials/siding/panel-siding/4-x-8-grooved-8-oc-fiber-cement-panel-siding/p-1444450980015-c-13382.htm?tid=8524842292862694295
http://www.menards.com/main/building-materials/siding/panel-siding/4-x-8-grooved-8-oc-fiber-cement-panel-siding/p-1444450980015-c-13382.htm?tid=8524842292862694295