
DIY Skull cleaning
- Thread starter Ikeepitcold
- Start date
JimP
Administrator
It would of been a lot better if he would of showed the process of cleaning the inside of the horns on that pronghorn or used a deer or elk skull for this video.
I know that there are quite possibly a video out there showing how to do a pronghorns skull but since he was doing it already.....
I know that there are quite possibly a video out there showing how to do a pronghorns skull but since he was doing it already.....
nicktrehearne
New Member
Great video Dan! I've done dozens of skulls myself but never with oxyclean. Will have to try it out on the next one! If you don't want to scrape the flesh for 20-30 minutes, try using a pressure washer set on the lowest pressure setting. I do all mine this way and it blasts it off in about 2 min.
I tried Dan Pickar's method last year on a mule deer buck and it worked great -- thanks for putting that together, Dan! I'm a bald guy so I did feel a little funny walking into a beauty salon supplier to get the 40 volume creme developer, but the stuff really worked. I told the girl what I was using it for and she was pretty amused...
JimP
Administrator
I actually took a couple of javelina skulls into the shop where I purchased my "Beauty Supplies" for them to see what I was doing with it. They wanted to keep one of the skulls for a display.
brianboh
Active Member
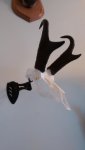
on doing antelope put the head in the microwave for about 30 seconds. take it out and the horns slide right off. get the meat off and glue back to the skull. if need be cut about quarter of the bone bone off to have it slide on easier
just don't let the wife know....on doing antelope put the head in the microwave for about 30 seconds. take it out and the horns slide right off. get the meat off and glue back to the skull. if need be cut about quarter of the bone bone off to have it slide on easier
brianboh
Active Member
CoHiCntry
Veteran member
Getting ready to do an antelope european. Anyone who's done this to an antelope... will the heat from just boiling the skull be enough to slip the horns off? If not, I'll have to wait for the wife to leave to stick it in the microwave! Thanks...
marshmstr
Member
Yes it's enough. Also, I like to put a little dawn soap in water.
Sent from my iPhone using Tapatalk
Sent from my iPhone using Tapatalk
CoHiCntry
Veteran member
I boiled it last night. What I found is that you need to really submerge the horns into the water so they get good and hot. I started by just submerging the skull which only submerged an inch or two of the horns. I kept pulling it out of the pot and trying to slip them off with no luck. I did manage to brake the nose off the skull though as I put my foot on it trying to get those horns off! Guess I got some gluing to do now. Mine seemed to be very stubborn and only after I really submerged the horns and let it boil for quite awhile was I able to pull the horns off. I also ended up boiling for closer to two hours. I didn't have a pressure washer available and all the "loose" stuff that your getting off wasn't exactly coming off as smooth as I thought it might. Next time, I will boil for 45 minutes or so then run it up to the car wash to blow everything off. Several lessons learned being my first one. I think they will go a little smoother from here on out.
Now I'm getting ready to do the bleaching. I watched a few different youtube videos on ways to do this and hopefully it goes smooth. We'll see...
Now I'm getting ready to do the bleaching. I watched a few different youtube videos on ways to do this and hopefully it goes smooth. We'll see...
Last edited:
CoHiCntry
Veteran member
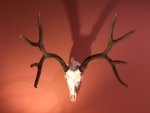
Finally got this thing done. Nothing short of a pain in the butt! I learned what not to do in a few situations too. I broke it's nose off as I mentioned in my last post. Then realized I boiled it way too long which made the skull rather fragile. I also realized I shouldn't have skinned the head out and let it sit for four day's before working on it. That let the grease/ oils really soak into the skull which is why I ended up boiling it so long trying to get the dark spots off. I tried soaking it in boiling water with the peroxide first (saw this method on a youtube video and it looked quicker) but their was still a lot of dark spots. Then I ended up putting the peroxide cream on it and letting it sit for about 48 hours. There are still some mildly dark spots but you can't really tell. Then I used white gorilla glue to try and glue the broken pieces. The glue reacted with something and turned a bright orange! Then I had to try and get all that off. Finally used elmers glue which seemed to work OK. I almost gave up on it and just bought a replica skull several times but I was determined to get it done. It's not perfect but it will work. Looking forward to doing another one to try and redeem myself! I'm usually pretty handy with stuff but this one had my number!
Last edited:
Vikingload
Member
Thanks for the update! The mount looks good and I was torn between a shoulder mount or something like this and I might do a setup like this as it looks ballin!!
Sent from my iPad using Tapatalk
Sent from my iPad using Tapatalk
JimP
Administrator
It still looks good even with the problems that you had.
Was this your first DIY euro mount?
Did you try using Dawn dish soap in the water to leach the oils out of it? I have had good results using it. Also did you actually boil the skull or do a long simmer? Boiling usually destroys the skull with all the bubble action that is going on. Also I usually use super glue to put things back together if there is some damage to the skull or teeth.
CoHiCntry
Veteran member
Yes, this was my first attempt at a euro mount. I did put a squirt of dawn in along with some oxi clean for the initial boil. Your right, it's more of a simmer than a boil. If it started to boil, I'd turn the heat down so it was just simmering.It still looks good even with the problems that you had.
Was this your first DIY euro mount?
Did you try using Dawn dish soap in the water to leach the oils out of it? I have had good results using it. Also did you actually boil the skull or do a long simmer? Boiling usually destroys the skull with all the bubble action that is going on. Also I usually use super glue to put things back together if there is some damage to the skull or teeth.
JimP
Administrator
When I do it I'll boil the skull in some sal soda until all the meat gristle and everything else is off of the skull. I'll then dump that water and put some fresh water on to cook with a little bit more sal soda and a couple cups of Dawn and let this cook for another couple of hours. But the time that I am through with the cooking of the skull it is usually around 6 hours later.
I'll then wait until the next day or so before I start the bleaching process.
I'll then wait until the next day or so before I start the bleaching process.
Slugz
Veteran member
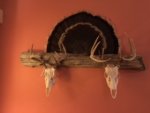
We have had our best luck with a Dawn/ 12 Mule Borax Combo. Looks great for all the problems you describe. I use Elmers wood glue when patching skull pieces together. Heres some pics for ideas for the next one.
robsev
Member
You have to be really careful with the microwave method. A few seconds too long and the horns will develop a bubble, and there's no fix to that.
CoHiCntry
Veteran member
I'm not sure how you guys are getting the head inside your microwave? It wouldn't even come close to fitting in mine. Either everyone else has a way bigger microwave than me... or i just shoot way bigger goatsYou have to be really careful with the microwave method. A few seconds too long and the horns will develop a bubble, and there's no fix to that.

wy-tex
Veteran member
Here's how we do it. Spouse's antelope skull went from hair on to cleaned not bleached in 1 day. Remove the bottom jaw and the ears back on the hide. Leave the the hide on the top of the skull. Cut around the base of the horns to loosen the hair holding them. When you boil them add some Carbonate of Soda to the water, taxidermy supply. It really loosens the grease and meat on the bone. The entire horn does not need to be submerged during the boiling. After only a few minutes, 10-30 depending on the boil rate, the horns will slip off. Twist them a little to loosen. After a while the entire hide will pull off of the skull and take a great amount of the meat with it. Boil until everything gets cooked, a few hours. Then you must pick off the small bits left. The brain can be cut up before boiling or after it will loosen and come out in pieces. Pull the cartilage out of the nasal areas. We use a long pair of cooking tweezers, 10-12 inches long. We also have some bent and straight picks from the auto parts store that work well for small places. For the bleaching we just use 40 % hydrogen peroxide from a beauty supply store. Submerge the skull in a plastic container and pour the liquid peroxide over the entire skull. You can place cotton clothes over the parts that will not submerge, soaked in the peroxide. This peroxide is very strong, be careful with it. It will take only a day or 2 maybe 3 to get it white. You can dilute the peroxide a little bit or also use 30 %. Rinse well with water then paper mache the horns back on. The liquid, or clear peroxide as it is called at the supply store, will eat away almost all of the very small bits of tissue left after the boil. I put Skidmore's liquid beeswax finish on our horns and antlers. The waxy finish seals them and gives them a natural looking appearance without a thick or fake looking coating.