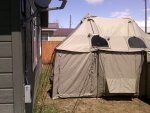
As a previous thread had been started in March on the Cabelas Ultimate Alaknak Tent, I mentioned I had one similar, the ISQ tent and would put up a picture review as soon as the snow went away. Well it has now and the yard was dry enough today to set it up. Albeit, I think I need a bigger yard to test it out, LOL, as you will see in the photos.
All the reviews on Cabelas site mention set it up at home before you take it to the woods. I am so glad I did. Most reviews said it took about one hour. If you have set up wall tents enough, then yes I can see it as a one hour tent the first time. maybe down to 30-40 minutes with strong knowledgable help after that. For me, it was an exploration that took about two and a half hours to get it up. I am possitive that now knowing all the pieces and such, it will be closer to that hour next time.
The material is super strong. Its the reason I was so drawn to buy one in the first place. Lighter than canvas, but twice or more heavy than a coleman style tent. I can see why condensation has been an issue for some users that are not used to having it in their tents. Canvas breaths, cheap tents will too. This puppy is one solid waterproof son of a gun. If the vents are not open, and guyed out, your not going to have enough airflow, and it will get wet inside.
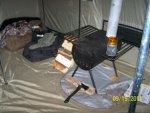
Also, the HUGE warning sign sewn into the tent next to the beer holder says to NOT use fuel burning heaters in the tend due to extreme carbon dioxide buildup, and it will create condensation. So for those who disregard this and do it anyway...well thats why it was rainin on ya in the morning. By the way, this would go for lanterns too, as the fuel will produce that H2O exhaust. Wood stoves are it, and for night time light, use an LED lantern.
I have not bought one as of yet, and plan on the Cabelas one when I do get one. If I do opt for a different stove I have also considered the Alaskan packer stoves as a second choice, and no mater what stove you do go for, its large enough to handle any one you want. I did get the roof panel that helps to protect the roof from hot embers. I noticed that there is not any special attention the sidewall of the tent for heat though. Interesting to me, as I know wood stoves radiate tons of heat and I would be nervous of it getting a tad warm and melting. I plan on making a back stop of some sort that also is open by the vent. Not sure of what material, but I will come up with something for it. Thought of a slimline style plywood, hearth and backstop, that is hinged that sets up like a stadium seat pad. Put a soffit vent on it so it lines up with the tents wall vent and it would give a nice stable platform if you will for the stove to sit on as well. Just an Idea, but its growing on me. If I do it, I will add pics of it later.
I also bought the extra floor liner for it. This is nice, and like other reviews I have seen online, I can see all the benefits of it and have not even been there done that to it yet. It will make it easier to clean up when its time to pack it up. Protect it from dirt, rocks, and fire embers ect that can get dragged inside.
I did put a tarp under the tent as a footprint, I always have done that with my other tents to keep forest sap and debris off the tent to further its life. So that makes a three layered tent floor and should be really really nice.
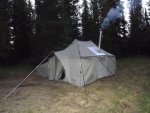
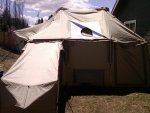
I bought the six pod version of this tent when it went on sale back in mid winter. I dont know that I will use all six pods most of the time, but it was nice to have them if I need them. I set it up today with only two, this is how it comes for the $1100.00 price, so if your considering one it will give you an Idea of what your getting in the photos. You can set two pods on the stove side with the stove in between them. One on the back side opposite of the door, and three on the side opposite of the stove.
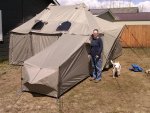
I set mine up today with one on the stove side and one directly opposite of this one on the three pod side. Due to restricted space in my back yard, guyropes were rigged up to hold my tent differently than it would be in the field, so these were just about the only spots I could use and worked out fine.
The tent comes with a good ammount of stakes. Guy ropes are limited, however each pod comes with more smaller stakes and a bunch more guy ropes, so there are plenty of rope set ups to get the tent nearly hurricane proof if needed.
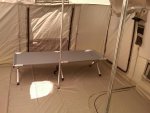
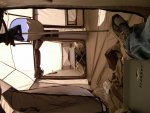
I love the two center poles inside. Could set up a table in there, put up a line between for lights or what ever you want to hang on it. Even with six pods set up, you COULD put three more jumbo cots inside the main body. More peeps on the floor if you skip cot options. If its just you and one more, it will be like the hiltons camp suite with all the room. With the pods and the cots out of the way, its so open inside its hard to explain.
I didnt buy the vestibule, and for the most part dont know that I want to, however if your tent is set up with bad weather beating on the door, one would solve that problem fast. However at $170, a tarp with tarp poles set up over the door seems like such a more useful option. I'm a redneck, so shaded porches are a must!! LOL.
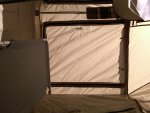
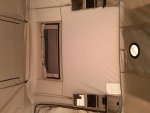
It has a few windows that also double as top vents if its not raining you can open up the clear vinyl panel and it really lets the breezes flow through it.
So here are some pic...and when I get a chance to take it out for a REAL camp outing I will update if anything comes up.
All the reviews on Cabelas site mention set it up at home before you take it to the woods. I am so glad I did. Most reviews said it took about one hour. If you have set up wall tents enough, then yes I can see it as a one hour tent the first time. maybe down to 30-40 minutes with strong knowledgable help after that. For me, it was an exploration that took about two and a half hours to get it up. I am possitive that now knowing all the pieces and such, it will be closer to that hour next time.
The material is super strong. Its the reason I was so drawn to buy one in the first place. Lighter than canvas, but twice or more heavy than a coleman style tent. I can see why condensation has been an issue for some users that are not used to having it in their tents. Canvas breaths, cheap tents will too. This puppy is one solid waterproof son of a gun. If the vents are not open, and guyed out, your not going to have enough airflow, and it will get wet inside.
Also, the HUGE warning sign sewn into the tent next to the beer holder says to NOT use fuel burning heaters in the tend due to extreme carbon dioxide buildup, and it will create condensation. So for those who disregard this and do it anyway...well thats why it was rainin on ya in the morning. By the way, this would go for lanterns too, as the fuel will produce that H2O exhaust. Wood stoves are it, and for night time light, use an LED lantern.
I have not bought one as of yet, and plan on the Cabelas one when I do get one. If I do opt for a different stove I have also considered the Alaskan packer stoves as a second choice, and no mater what stove you do go for, its large enough to handle any one you want. I did get the roof panel that helps to protect the roof from hot embers. I noticed that there is not any special attention the sidewall of the tent for heat though. Interesting to me, as I know wood stoves radiate tons of heat and I would be nervous of it getting a tad warm and melting. I plan on making a back stop of some sort that also is open by the vent. Not sure of what material, but I will come up with something for it. Thought of a slimline style plywood, hearth and backstop, that is hinged that sets up like a stadium seat pad. Put a soffit vent on it so it lines up with the tents wall vent and it would give a nice stable platform if you will for the stove to sit on as well. Just an Idea, but its growing on me. If I do it, I will add pics of it later.
I also bought the extra floor liner for it. This is nice, and like other reviews I have seen online, I can see all the benefits of it and have not even been there done that to it yet. It will make it easier to clean up when its time to pack it up. Protect it from dirt, rocks, and fire embers ect that can get dragged inside.
I did put a tarp under the tent as a footprint, I always have done that with my other tents to keep forest sap and debris off the tent to further its life. So that makes a three layered tent floor and should be really really nice.
I bought the six pod version of this tent when it went on sale back in mid winter. I dont know that I will use all six pods most of the time, but it was nice to have them if I need them. I set it up today with only two, this is how it comes for the $1100.00 price, so if your considering one it will give you an Idea of what your getting in the photos. You can set two pods on the stove side with the stove in between them. One on the back side opposite of the door, and three on the side opposite of the stove.
I set mine up today with one on the stove side and one directly opposite of this one on the three pod side. Due to restricted space in my back yard, guyropes were rigged up to hold my tent differently than it would be in the field, so these were just about the only spots I could use and worked out fine.
The tent comes with a good ammount of stakes. Guy ropes are limited, however each pod comes with more smaller stakes and a bunch more guy ropes, so there are plenty of rope set ups to get the tent nearly hurricane proof if needed.
I love the two center poles inside. Could set up a table in there, put up a line between for lights or what ever you want to hang on it. Even with six pods set up, you COULD put three more jumbo cots inside the main body. More peeps on the floor if you skip cot options. If its just you and one more, it will be like the hiltons camp suite with all the room. With the pods and the cots out of the way, its so open inside its hard to explain.
I didnt buy the vestibule, and for the most part dont know that I want to, however if your tent is set up with bad weather beating on the door, one would solve that problem fast. However at $170, a tarp with tarp poles set up over the door seems like such a more useful option. I'm a redneck, so shaded porches are a must!! LOL.
It has a few windows that also double as top vents if its not raining you can open up the clear vinyl panel and it really lets the breezes flow through it.
So here are some pic...and when I get a chance to take it out for a REAL camp outing I will update if anything comes up.